 Arrow Escape
Arrow Escape Tips: Find the Right Removal Order
A crowded board becomes easier when you focus on one dependency at a time: which arrow must leave before another can move? These tips apply to the actual rules of Arrow Escape, without guessing at hidden mechanics.
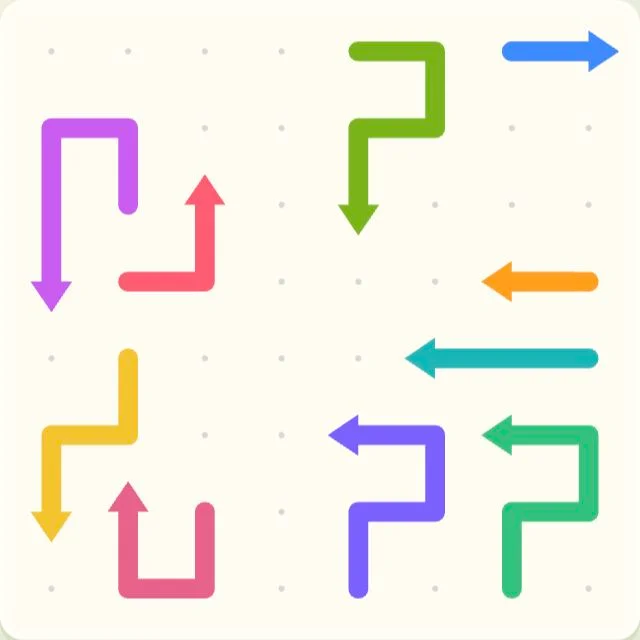
Start with clear edge exits
On level 1, the blue arrow in the upper-right corner points straight off the board. It is a safe first move. The yellow downward arrow near the bottom-left edge is another clear exit. Being near an edge is only a clue: always check the line ahead of the arrowhead.
Follow the blocker, not the whole maze
The downward purple arrow on the far left cannot leave because the yellow arrow occupies the same column below it. Yellow points down and has a clear exit. Remove yellow, then purple. This two-step dependency is more useful than repeatedly tapping the blocked piece.
Recheck after every removal
Removing one arrow can open several paths, but it does not change the direction of the remaining arrows. Inspect the new gap before tapping again. A long winding body can leave safely; a short arrow can still be blocked by a distant piece.
Protect lives when chasing stars
Three stars require all starting lives. If your goal is a perfect clear, take time to trace each exit. A faster time does not compensate for a lost life in the star calculation. Use a hint when unsure; restart if you want to attempt a clean run.
Speed up only when the route is certain
In challenge mode, a mistaken tap costs 10 seconds. Two speculative taps can lose 20 seconds, so a short inspection is often worthwhile. Scan for a few clear exits, remove them, then reassess rather than tapping randomly through the middle.
Practise on the same board
Replay a level to learn its dependencies and compare your results on the same map. The level picker shows your saved best stars. These examples are for level 1; later shapes and arrow arrangements differ, but the straight-line exit test stays the same.